How to Make a Floor Plan of Your House
A floor plan is a scaled diagram of a building or a room, viewed from above. It's a valuable tool for various purposes, including home renovation, interior design, furniture arrangement, and even real estate listings. This article provides a comprehensive guide on how to create a floor plan of your house, covering various techniques and tools that can be used.
1. Gathering Information and Tools
The first step in creating a floor plan is gathering essential information and tools. This includes measuring the dimensions of each room accurately, including length, width, and height. A measuring tape is an essential tool for this process. You will also need a notebook to record the dimensions as well as a pencil and paper or a computer with a drawing program for sketching the plan.
Other useful tools for creating a floor plan include a laser distance meter for measuring longer distances, a level for ensuring accurate measurements, and a compass for determining the direction of each wall. Photography can also be helpful in capturing the layout of the rooms and recording details such as door and window placement. It's essential to choose a suitable scale for the floor plan. A common scale is 1/4 inch equals 1 foot, but you can adjust this based on the size of your house and your preference.
2. Measuring the Rooms
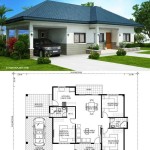
Once you have the necessary tools, you can start measuring the rooms in your house. Begin by measuring the length and width of each room, including doors and windows. If you are planning to renovate, you can also include any existing furniture or fixtures that you intend to keep. It's important to record the measurements accurately in your notebook, noting each room and its dimensions. For example, you could record "Living Room: 15 feet x 12 feet."
When measuring rooms, take note of any irregularities in the walls, such as angled corners or recessed areas. Also, pay attention to the dimensions of the doors and windows, including their width, height, and swing direction. This information will be crucial when drawing the floor plan.
3. Sketching the Floor Plan
With the measurements in hand, you can start sketching the floor plan. You can use a pencil and paper or a computer with a drawing program. For a traditional approach, use graph paper and a pencil to draw the rooms to scale. Alternatively, you can use a drawing program such as AutoCAD, SketchUp, or even Microsoft Word for a more digital approach.
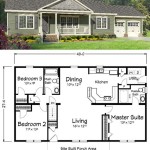
Start by drawing the outline of each room, connecting the measured dimensions to create a realistic representation. Then, carefully add details like doors, windows, and any existing fixtures or furniture that you want to include. Be sure to label each room and add necessary dimensions for clarity.
4. Adding Essential Details
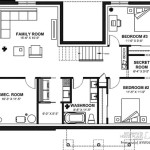
The floor plan should provide a detailed overview of the house for its intended purpose. Include features like the location of electrical outlets and switches, plumbing fixtures, heating and cooling vents, and any other relevant details. You can also include information about the materials used for flooring, walls, and ceilings.
If you are creating a floor plan for home renovation, it's beneficial to mark areas where you plan to add or remove walls, change the layout of rooms, or install new fixtures. This will help visualize the future changes and ensure a smooth renovation process.
5. Enhancing the Floor Plan
Once you have a basic floor plan, you can enhance it with additional features. You can use different colors or line styles to distinguish between walls, doors, windows, and other features. Adding symbols or icons for furniture, appliances, or other significant elements can further improve readability and clarity.
Another way to enhance the floor plan is to add a key or legend explaining the different symbols and colors used in the diagram. This will make it easy for anyone to understand the plan, even if they are unfamiliar with floor plan conventions.
6. Finalizing the Floor Plan
After adding all the necessary details, review the floor plan carefully to ensure accuracy and completeness. Double-check the measurements, the placement of features, and the overall layout of the plan. If you are creating a digital floor plan, you can adjust the appearance, save the plan in different formats, and share it with others easily.
A well-made floor plan can be a valuable asset for both personal and professional purposes. By following the steps outlined in this guide, you can effectively create a floor plan of your house, providing a clear and comprehensive representation of its layout and features.

Floor Plan Creator And Designer Free Easy App

Floor Plans Learn How To Design And Plan

How To Draw A Floor Plan Live Home 3d

Make Your Own Blueprint How To Draw Floor Plans

House Plans How To Design Your Home Plan

Make Your Own Floor Plans

Make Your Own Blueprint How To Draw Floor Plans Drawing House Sketch Plan

House Plans How To Design Your Home Plan

Floor Plans Learn How To Design And Plan

Tips For Selecting The Right Floor Plan Your Home Sater Design Collection