How To Create A House Floor Plan
Creating a house floor plan is a fundamental step in any construction or renovation project. A well-designed floor plan not only visualizes the spatial arrangement of a building but also serves as a blueprint for efficient construction, cost estimation, and interior design. This article will explore the process of crafting a comprehensive floor plan, encompassing essential considerations and techniques.
Understanding Project Requirements and Needs
Before embarking on the design process, a thorough understanding of the project's requirements is paramount. This involves identifying the needs and preferences of the occupants, the intended use of each space, and any specific constraints or regulations that may apply. Consider the following factors:
Occupancy: Determine the number of people who will reside in the house. This will influence the number of bedrooms, bathrooms, and living areas required. Consider future needs, such as a growing family or aging in place.
Lifestyle: Evaluate the lifestyle of the occupants. Do they entertain frequently? Do they work from home? Do they require specialized spaces for hobbies or activities? This will shape the layout and functionality of the house.
Budget: Establish a realistic budget for the construction or renovation project. The size and complexity of the floor plan will directly impact the cost of materials and labor. Prioritize essential features and consider cost-effective design alternatives.
Site Considerations: Analyze the site's topography, orientation, and any existing structures. The floor plan should be designed to maximize natural light, ventilation, and views while minimizing potential challenges such as drainage issues or steep slopes. Local building codes and zoning regulations must also be adhered to.
Functional Requirements: Define the specific functions that each space must serve. Consider the flow of traffic between rooms, the placement of utilities (plumbing, electrical, HVAC), and any accessibility requirements. Ensure that the floor plan meets the practical needs of the occupants.
Once these requirements are clearly defined, a detailed program can be developed that outlines the size and relationship of each space within the house. This program will serve as a guide throughout the design process.
Sketching and Conceptualizing the Layout
With a clear understanding of the project requirements, the next step involves sketching and conceptualizing the layout of the floor plan. This is an iterative process, and it is important to explore multiple options before settling on a final design. Consider the following techniques:
Bubble Diagrams: Start by creating bubble diagrams to visualize the relationships between different spaces. These diagrams use circles or bubbles to represent rooms and lines to indicate connections between them. This helps to establish the overall flow and organization of the house.
Schematic Drawings: Develop schematic drawings that show the approximate size and shape of each room. These drawings should include dimensions and the placement of doors, windows, and major furniture pieces. Experiment with different layouts to find the most efficient and functional arrangement.
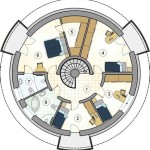
Consider Circulation Patterns: Pay close attention to circulation patterns, ensuring that there are clear and unobstructed pathways between rooms. Avoid creating bottlenecks or dead-end corridors. Consider the natural flow of traffic and the placement of furniture to optimize movement throughout the house.
Prioritize Natural Light and Ventilation: Orient the house and position windows strategically to maximize natural light and ventilation. Consider the sun's path throughout the day and the prevailing winds. This will improve the comfort and energy efficiency of the house.
Think About Future Needs: Design the floor plan with future needs in mind. Consider the possibility of adding an addition or converting an unfinished space into a usable room. Ensure that the layout is flexible and adaptable to potential changes in the occupants' lifestyle.
During this phase, it is beneficial to create multiple iterations of the floor plan, exploring different possibilities and refining the design based on feedback and further analysis. Don't be afraid to experiment and challenge conventional ideas. The goal is to create a floor plan that is both functional and aesthetically pleasing.
Creating Detailed Floor Plans
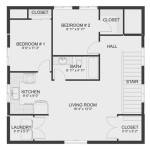
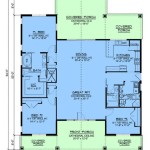
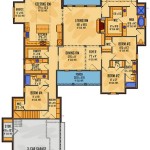
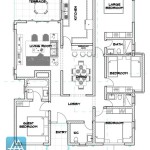
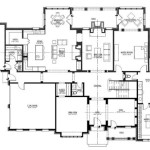
After the schematic design is finalized, the next step is to create detailed floor plans that include precise dimensions, wall thicknesses, door and window sizes, and the location of all fixtures and appliances. This requires attention to detail and adherence to building codes and standards. Utilize the following techniques:
Choose a Drafting Method: Decide whether to create the floor plan manually or using computer-aided design (CAD) software. Manual drafting involves using traditional tools such as pencils, rulers, and triangles, while CAD software allows for precise and efficient drawing using a computer. CAD software offers advantages such as the ability to easily edit and modify the floor plan, as well as the ability to create 3D models.
Scale and Dimensions: Draw the floor plan to a specific scale, such as 1/4 inch = 1 foot or 1/8 inch = 1 foot. This will ensure that all dimensions are accurate and proportional. Use precise measurements to indicate the size of each room, the width of doorways, and the location of windows. Double-check all dimensions to avoid errors.
Wall Thickness and Construction Details: Indicate the thickness of walls and the materials used in their construction. Differentiate between interior and exterior walls. Show the location of studs, insulation, and any other structural elements. This information is crucial for accurate cost estimation and construction.
Door and Window Schedules: Create separate schedules that list the types, sizes, and locations of all doors and windows in the house. This will ensure that the correct components are ordered and installed. Include details such as the swing direction of doors and the type of glazing used in windows.
Fixture and Appliance Placement: Show the precise location of all fixtures and appliances, including toilets, sinks, bathtubs, showers, stoves, refrigerators, and dishwashers. Indicate the size and type of each appliance. Ensure that there is adequate clearance around each fixture for comfortable use.
Electrical and Plumbing Layout: Indicate the location of electrical outlets, switches, and lighting fixtures. Show the routing of electrical wiring and plumbing pipes. This is crucial for ensuring that the house is properly wired and plumbed. Consult with a licensed electrician and plumber to ensure that the electrical and plumbing layout meets all applicable codes and standards.
Labeling and Annotation: Clearly label all rooms and spaces on the floor plan. Add notes and annotations to explain any specific design features or construction details. Use a consistent and easy-to-read font. The floor plan should be clear and understandable to anyone who needs to use it.
Review and Revision: After completing the detailed floor plan, carefully review it for errors and omissions. Compare the floor plan to the project requirements and ensure that all needs have been met. Make any necessary revisions before proceeding to the next stage of the project. Share the floor plan with other stakeholders, such as contractors, interior designers, and building inspectors, to gather feedback and ensure that everyone is on the same page.
Creating a house floor plan is a complex process that requires careful planning, attention to detail, and a thorough understanding of building codes and standards. By following the steps outlined in this article, it is possible to create a floor plan that is both functional and aesthetically pleasing, meeting the needs of the occupants and facilitating a successful construction or renovation project.

Floor Plan Creator And Designer Free Easy App

Floor Plans Types Symbols Examples

Floor Plans Types Symbols Examples

Blender For Noobs 10 How To Create A Simple Floorplan In

Floor Plans Types Symbols Examples

Floor Plan Creator And Designer Free Easy App

Easy Home Building Floor Plan Cad Pro

How To Create A Small House Floor Plan That Works For You

House Floor Plans Your Best Guide To Home Layout Ideas

Floor Plan Create 2d 3d Plans Autodesk