How To Draw Floor Plans
Floor plans are a crucial aspect of any architectural or interior design project. They provide a detailed representation of the layout, dimensions, and spatial relationships within a building. Creating accurate and well-drawn floor plans is essential for effective communication, coordination, and decision-making throughout the design and construction process.
Understanding Floor Plan Conventions
Before embarking on drawing floor plans, it is important to familiarize yourself with established conventions and symbols. These conventions ensure consistency and clarity in architectural drawings, allowing professionals to interpret them effectively.
Some common conventions include:
- Using a scale to represent actual dimensions
- Drawing walls as solid lines and doors as openings
- Indicating windows with symbols
- Including room labels and dimensions
- Using specific line weights and hatching patterns to differentiate between different building elements
Materials and Tools Required
To create detailed and precise floor plans, you will need the following materials and tools:
- Drawing paper or vellum
- Pencils (ranging from HB to 6B)
- Eraser
- Scale ruler
- T-square or drafting machine (for parallel lines)
- Protractor (for drawing angles)
- Architectural templates or stencils (optional)
Steps to Draw Floor Plans
Follow these steps to draw accurate and professional floor plans:
1. Measure and Scale
Begin by measuring the building or space you want to draw and determining the appropriate scale. The scale dictates the ratio between the drawing and the actual dimensions. For example, a scale of 1:50 means that 1 cm on the drawing represents 50 cm in reality.
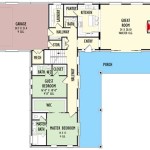
2. Draw the Perimeter Walls
Using the scale ruler and T-square, draw the perimeter walls of the building. Ensure that the walls are drawn to the correct dimensions and thickness.
3. Add Interior Walls and Partitions
Divide the interior space into rooms and other functional areas by drawing interior walls and partitions. Pay attention to the thickness and placement of walls, as they affect the spatial relationships.
4. Mark Doors and Windows
Indicate the location and size of doors and windows using appropriate symbols. Doors are typically drawn as openings in the walls, while windows are represented by a combination of lines and symbols.
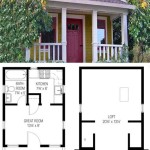
5. Dimension the Rooms
Add dimension lines and labels to each room. Dimensions should include the length, width, and height of the space.
6. Include Annotations
Add annotations to provide additional information about the floor plan. This can include room names, furniture arrangements, or other relevant details.
7. Refine and Finalize
Once the main layout is complete, refine the floor plan by adding details such as fixtures, appliances, and structural elements. Check for accuracy and consistency in scales, dimensions, and symbols.
Tips for Effective Floor Plans
- Use a clear and consistent line weight throughout the drawing.
- Pay attention to the placement and proportion of elements to avoid overcrowding.
- Label all rooms and spaces clearly.
- Use color or shading to differentiate between different areas or materials.
- Consider including a north arrow to indicate the orientation of the plan.
Conclusion
Drawing accurate and detailed floor plans requires practice, understanding of conventions, and attention to detail. By following these steps and incorporating the tips mentioned above, you can create professional and informative floor plans that effectively communicate your design ideas and facilitate successful building projects.

Floor Plan Creator And Designer Free Easy App

How To Draw A Floor Plan The Simple 7 Step Guide For 2024

Draw Floor Plans With The Roomsketcher App

Draw Floor Plans In Half The Time Cedreo

Draw Floor Plans Create Professional

How To Draw A Floor Plan Live Home 3d

Floor Plan Wikipedia

How To Draw A Floor Plan The Simple 7 Step Guide For 2024

Floor Plan Creator And Designer Free Easy App

Make Your Own Blueprint How To Draw Floor Plans