How to Draw Floor Plans For Free
Creating accurate floor plans is essential for various purposes, from home renovation projects to real estate listings. While professional software can be expensive, several free options are available for drawing floor plans. This article will guide you through the process of creating floor plans using free tools, highlighting key steps and considerations.
1. Choose a Free Floor Plan Software
The first step in drawing floor plans for free is to select suitable software. Numerous online and downloadable applications offer free versions with basic functionalities. Some popular options include:
*Floorplanner:
This web-based software provides an intuitive interface and a library of pre-designed furniture and objects. It offers a free plan with limited features, sufficient for simple floor plans. *Sweet Home 3D:
This free, downloadable software is known for its user-friendly interface and detailed 3D modeling capabilities. It allows you to create realistic floor plans and visualize your designs. *SketchUp Free:
This web-based 3D modeling platform offers a free version with basic tools for drawing floor plans. It provides a more robust experience for users comfortable with 3D modeling principles. *RoomSketcher:
This online tool offers a free plan with limited features, allowing you to create basic floor plans and visualize furniture placement.Explore the features and limitations of different free software options before making a selection. Consider your project's complexity and your familiarity with 3D modeling tools.
2. Gather Necessary Information
Before you start drawing, it is crucial to gather accurate information about the space. This information will form the foundation of your floor plan and ensure its accuracy. The following steps are essential:
*Measure the Space:
Use a measuring tape to accurately measure the dimensions of each room. Record lengths, widths, and heights. *Take Photographs:
Capture images of the space from multiple angles, including walls, windows, doors, and any existing fixtures. *Identify Key Features:
Note important features like walls, windows, doors, staircases, and built-in appliances. *Consider Furniture Placement:
If you plan to include furniture in your floor plan, note the dimensions and placement preferences.Having accurate measurements and detailed information will significantly simplify the drawing process.
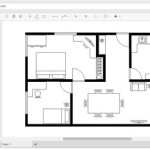
3. Start Drawing Your Floor Plan
Once you have gathered all the necessary information, you can begin drawing your floor plan using the chosen software. The following steps provide a general guide for creating an accurate floor plan:
*Create the Outline:
Start by drawing the exterior walls of the space using the appropriate tool in your chosen software. Ensure that the dimensions are accurate. *Add Interior Walls:
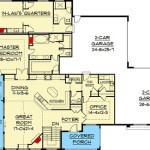
Draw interior walls, including partitions, to define rooms and spaces. *Place Windows and Doors:
Add windows and doors in their correct locations, ensuring accuracy in size and placement. *Include Fixtures:
Add fixtures, such as sinks, appliances, and other built-in components. *Add Furniture:
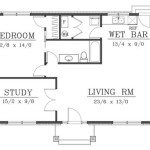
If you plan to include furniture, place it in your desired location. *Add Text and Labels:
Include text labels to indicate the dimensions of rooms, windows, and doors.Remember to regularly save your progress and refer to your measurements and photographs for accurate placement and dimensions.
4. Refine and Enhance Your Floor Plan
Once you have a basic floor plan, you can refine and enhance it to make it more detailed and visually appealing. Consider the following steps:
*Add More Details:
Include additional features like furniture, electrical outlets, light fixtures, and heating vents. *Use Different Colors:
Use colors and textures to differentiate rooms and highlight specific features. *Add Symbols:
Use standard symbols to represent furniture, appliances, and other objects. *Adjust Layout:
Modify the layout of rooms and furniture to optimize space and flow. *Add Dimensions:
Include dimensions for walls, doors, and other important features.By applying these enhancements, you can create a comprehensive and visually appealing floor plan that serves your intended purpose.
5. Export and Share Your Floor Plan
Once you are satisfied with your floor plan, you can export it in different formats for sharing or printing. Most free software options offer export functionalities, including JPG, PNG, PDF, and DXF formats.
When exporting, choose a format suitable for your needs. For sharing online, consider using formats like JPG or PNG. For printing, PDF is a suitable option. DXF is a common format for exchanging CAD data.

How To Make Floor Plans For Free In Sketchup

Floor Plan Creator And Designer Free Easy App

Free Floor Plan Designer

Floor Plan Creator Planner 5d

Floor Plan Creator Planner 5d

Free Floor Plan Creator Edrawmax

Draw Floor Plans With The Roomsketcher App

Draw Floor Plans With The Roomsketcher App

Draw Floor Plans In Half The Time Cedreo

How To Draw A Floor Plan Live Home 3d